Q: I’m in the planning stages for my first pizzeria and I would like to know the options for holding dough balls in the cooler?

Tom Lehmann
Pizza Today Resident Dough Expert
A: The options for dough ball storage in the cooler are as follows:
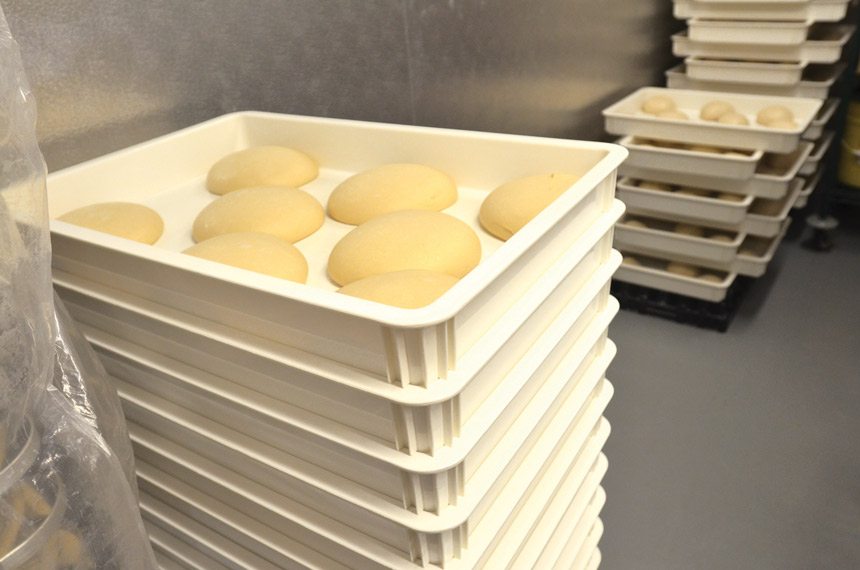
- Dough boxes are probably the most popular method. The dough boxes need to be sized to the weight of the dough balls. For example, dough balls weighing up to about 14 ounces can be stored in the shallow box. Anything heavier will most likely need to go into the deeper dimensioned box. Many of the dough boxes have molded — in cleats to help stabilize the stack of boxes when they are cross-stacked. Some boxes require individual lids for each box, while others are designed so the boxes can be stacked so each box serves as a lid for the box beneath it. With this feature you only need a lid for the top box in a stack, or you can also use an empty box as a lid.Some manufacturers provide dough boxes in various colors to help in identifying the day of the week in which the dough was made (or, in some cases, the type or weight of the dough balls contained within the box). Some manufacturers even go so far as to provide special scrapers with corners having a radius the same as that of their box to facilitate scraping any dough from the box. These scrapers are also designed to be used to assist in removing the dough balls from the box with minimum distortion to the dough ball.
- Another popular method for holding dough balls in the cooler is to place them onto standard 18 by 26 (inches) aluminum sheet pans. Each sheet pan is then covered in a plastic food bag and placed into a wheeled, vertical pan rack. It should be noted that even with this method for storing the dough balls they will need to be left un-bagged for approximately two hours (the same as cross-stacking, which is required when dough boxes are used). Once bagged, the dough balls can be held in the cooler for up to three days prior to use.
- The third option also employs the same 18 by 26-inch aluminum sheet pans, but in this case the dough balls are lightly oiled and placed into individual plastic food bags. The open end of each bag is twisted into a ponytail to close it and tucked under the dough ball as it is placed onto the sheet pan. There can be some advantages to this method of storing the dough balls as you can get a higher dough ball count on each pan since there is no fear of the dough balls growing together. This procedure also does not require that the dough balls be left uncovered (cross-stacked) as the other storage methods do. This is because the plastic bag provides little or no insulation to the dough; therefore, it cools quickly and uniformly. And because the plastic bag provides essentially no head space around the dough ball, there is no place for condensation to collect to cause problems later on in regards to a sticky dough or excessive bubbling.
- A fourth option is to use individual fermentation containers where a single dough ball is placed into its own container. The problems associated with this method of dough storage are the same as associated with the dough boxes in that the containers must be left open/un-lidded for a period of time to allow the dough to cool uniformly before closing/lidding the containers. Failure to do this will result in inconsistent dough fermentation as well as the formation of condensation on the inside of the container, resulting in a wet, sticky dough with a greater propensity to bubble during baking. By far, the greatest drawback to using these individual fermentation containers is the fact that they need to be washed regularly and that can be a chore (not to mention the space required to store all of those containers when we’re looking at using 200 to 300 of them every day). For this reason alone, I find it difficult to recommend this approach unless the number of pizzas to be made on a daily basis is very low or there is no other viable alternative to dough ball storage for your specific shop conditions.
In the end, the method that you use to store the dough balls will depend upon your shop conditions, availability of cooler space, number of dough balls that will need to be inventoried and capital that you have available to invest in dough storage. Many new shops will begin using a low-cost approach such as No. 2 or No. 3 above and then progress on to using the commercial dough storage boxes as described in approach No. 1 as their business grows.
Q: We bake our pizzas at nearly 800 F and we’re happy with all aspects of our pizzas but when we have tried to make any kind of a dessert pizza we get excessive charring around the edges of the crust from where the butter and/or sugar has run over the edge of the crust during baking. Aside from making a raised edge, is there any other way to prevent this from happening?
 A: The best solution that I’ve found to address this problem is to bake the dessert pizzas in some type of a pan or on a flat disk which has a solid, non-perforated edge around the disk. Possibly the most effective pan in this regard is what is generally referred to as a “cutter” pan. These pans have a 40-degree angled side that provides a simple raised edge to help hold any butter, sugar or sweet toppings on the dough so they cannot run off during baking. The pan itself will also reduce some of the deck heat to the bottom of the pizza, which usually results in a better presentation for a dessert type of pizza. Depending upon the crust color you are looking for on the bottom of the pizza, you can adjust the color without changing the oven temperature by using a dark colored pan for a darker crust color or a bright colored pan for a lighter crust color. Additionally, a screen can be added under the pan to create an air gap between the pan and the oven deck surface, which will further reduce the bottom crust color or allow the pizza to be baked longer, if necessary, without excessive bottom crust color development.
Tom Lehmann is a former director at the American Institute of Baking in Manhattan, Kansas and Pizza Today’s resident dough expert.
